
By Rich Sacher, 2018
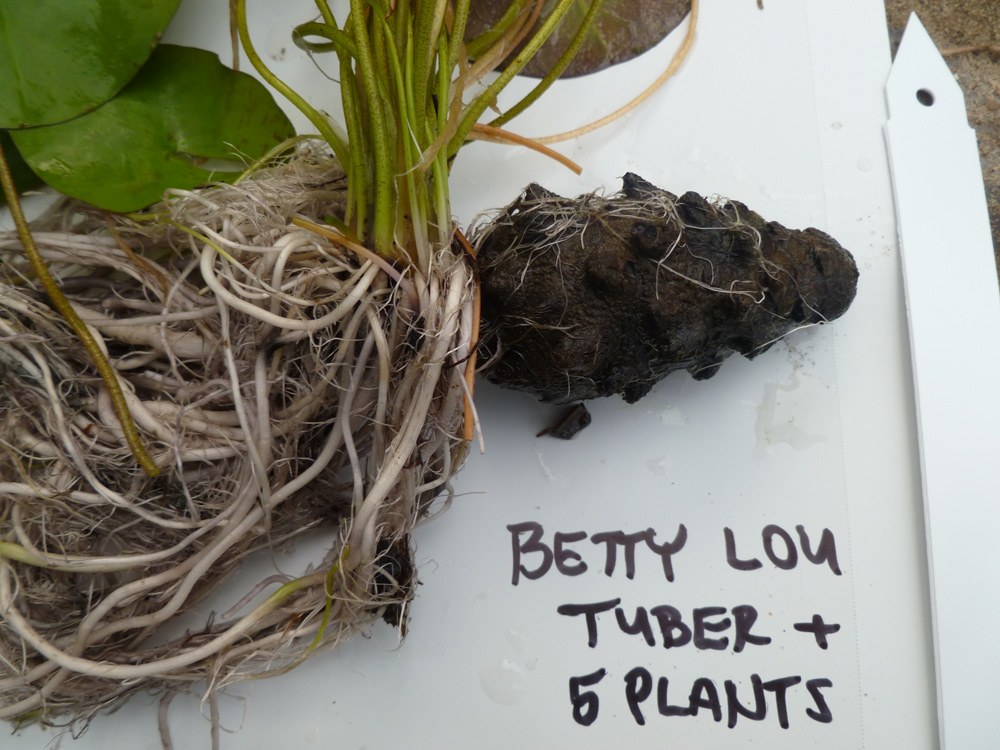
The native waterlilies of Australia are exceptionally desirable, but for too long they have had an undeserved reputation for being difficult to grow. It would be wonderful to see these beauties more widely grown. Here are the results of my growing, hybridizing and propagating Australian water lilies for the past ten years. These findings apply to any Aussie species, its hybrids, and its inter subgeneric hybrids! Let’s start with my cross between immutabilis and colorata, which is an inter subgeneric hybrid. I named the best seedling in memory of my sister, Betty Lou. I am happy to report that it is now being successfully grown in many countries around the world.
Immutabilis x colorata is not a difficult cross to make, and others have done so; my criteria for selecting my clone (Betty Lou) from this Australian hybrid were:
1) A much more compact size than other crosses with Australian natives.
2) A constant bloomer, once mature, until late in the season.
3) Easy to grow, easy to propagate, easy to store tubers over the winter..
4) Typical flower form for an Aussie, but with unusual red/pink stamens.
5) Short, sturdy flower stems that resist falling over in wind and rain
Making tubers: Transplant 2 or 3 small, rooted offshoots from a tuber into fertilized soil in a 4 inch (10 cm) pot; place in a pond with full sun, with water temperature at least 70-80 degrees F. (21-26 C.) Do not fertilize again; remove any roots that escape from the bottom of the pot, so the plant starves. Tubers will form in 6-8 weeks, and the plants will go dormant. Remove the tubers from the soil, rinse clean, and store in barely damp peat moss, in a zip lock plastic bag, at 60-70 degrees F. (15-21 C.) Another way to store the tubers is to wrap them in a small piece of wet cloth or paper, and store without peat moss or water, in a TIGHTLY sealed plastic bag. Tubers will be fine like this for up to a year…and maybe much longer. In Australia, many ponds are seasonal, and evaporate in the dry season. The tubers of the native lilies lie dormant in the mud, and sprout again when the pond refills with rain. Storing our tubers in damp peat moss or cloth MAY be duplicating the natural dormancy cycle for Aussie tubers. (Just a theory!)
Fertilized soil: My mix is one six inch pot of sandy loam, one handful of peat moss, and one full tablespoon of granular Azalea/Camellia fertilizer (13-8-15), mixed well. I have also used 13-13-13 when that was more convenient. The peat moss adds acidity to the mix, and acts like a biological sponge to hold onto the dissolving fertilizer, so it will not dissipate too quickly in my very sandy soil. This mix can be used on the small, rooted plants when they are removed from the tuber and also at every stage of transplanting to larger pots. I like to put more fertilizer in the bottom of 10 inch (25 cm) pots when I am transplanting six inch (15 cm) potted lilies into final pots for our local sales. In this case, I add a handful of peat moss to the bottom of the pot before sprinkling in two tablespoons of fertilizer. I then put an inch (2.5 cm) of fertilized soil on top of the peat, then the unpotted six inch water lily, and fill in around the soil mass with more fertilized soil. (This is my protocol for all water lilies, tropical and hardy!) NOTE: If your soil is not very sandy, you may not need the peat moss, and you may use less fertilizer.
ALSO NOTE: My experience has shown that it is much better to use pots with holes in the bottom for growing ALL water lilies. I use ordinary nursery pots, and put peat moss over the holes inside the pot, so my sandy soil will not escape. If there are no holes in the pot, anaerobic conditions can develop in summer, and kill the roots in the bottom half of the pot. This NEVER happens if there are holes in the pot bottom, allowing an exchange of water and oxygen at the lower root level. If I have any pots with no holes, I use a knife and make some holes!
Barely damp peat moss: Peat moss is acidic and reduces the possibility of rot while the tuber is in storage…although sometimes, a superficial mold may occur. The peat moss should be damp, not wet. Pick up a hand full of peat moss, and squeeze it hard; if any water comes out, it is too wet. The peat should mostly hold together when you release your grip. If it falls completely apart, it is too dry.
Zip lock plastic bags for tubers: Use high quality quart plastic bags, and seal them tight. They only need enough peat moss in them to surround the tubers. If you are not using peat moss, use a wet piece of cloth or paper to wrap the tuber, and place it in the bag without water, and TIGHTLY seal the bag. You want the moisture to stay in the bag during storage.
I prefer not to put more than three tubers in a bag; only two tubers if large, or up to four tubers if they are small. Label each bag. Store indoors 60-70 degrees F. (15-21 C.). I keep mine in my office. I roll up each bag like a burrito, to save room, and place into a tub or bin with a tight cover. PROTECT these bags from rodents when storing them. Mice and rats LOVE to eat tubers. You have been warned!
Sprouting the tubers: In early February, (or at least four months before your target date for first sales) the tubers should be washed completely free of peat moss, or removed from their paper/cloth wrapping, and placed two or three to a zip lock bag of clear water; but do not put too many tubers in a bag, because the new plants will be more difficult to separate once they have roots and leaves.
These bags are submerged in a tub of heated water in a greenhouse…an aquarium heater can be used to keep the temperature at 80-90 degrees F, (26-32 C.). If the tub is large enough to warrant it, a very small pump (30-40 gph) can be placed in the tub to circulate the heated water…avoiding hot/cold spots. Some hornwort can be placed in the heated tub to prevent green water, which would block sunlight to the developing plantlets. A few small Medaka fish may be used, to prevent mosquitos.
NOTE: some tubers produce rooted plants in three weeks; others may take three months. This is why it makes more sense NOT to plant the tubers into soil when they are still dormant…rather, sprout them in bags of water, and plant only those which have rooted plants on them. This saves time and space, and makes best use of the heated water bath.
Some sunlight should be available when the tubers begin to sprout and put out leaves. If some air is left in each bag, the bags will float near the surface, making it easier for them to get sunlight…and easier to check plant progress. Check each bag once a week to see if any tubers have enough plant growth with roots; if so, it is ready to be removed from the bag of water, and planted into fertilized soil.
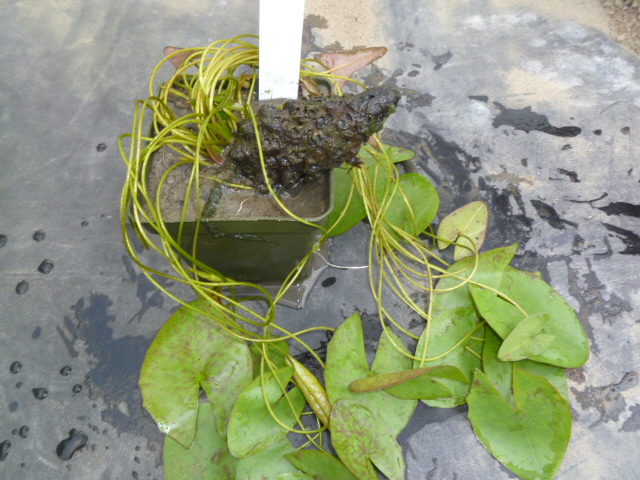
Plant the sprouted tubers: Those tubers with small plants and roots attached are now planted, in fertilized soil, in a 4 inch (10 cm) pot. I leave most of the tuber exposed at a 45 degree angle above the soil line…only the growing points and roots need to be in the soil. This angle of the tuber encourages the small plants to develop short runners at the crown of the tuber, making it much easier to remove the plants later on, when the root system is well developed. At this point, water temperature of 70-80 degrees F. (21-26 C) is sufficient for the newly potted tubers, although higher temperature will result in faster growth. If your tank of heated water has the room, these potted tubers can be left in the warm water for a week or so, before moving to a pond which is 75 degrees or warmer.
NOTE: By planting the tuber with the small plants still attached, it greatly increases the growth of roots and leaves for ALL the attached young plants. Smaller plants, which may not have sufficient roots upon planting, will continue to develop while attached to the tuber, whereas they might not survive if they were removed prematurely along with the older, better rooted plants.
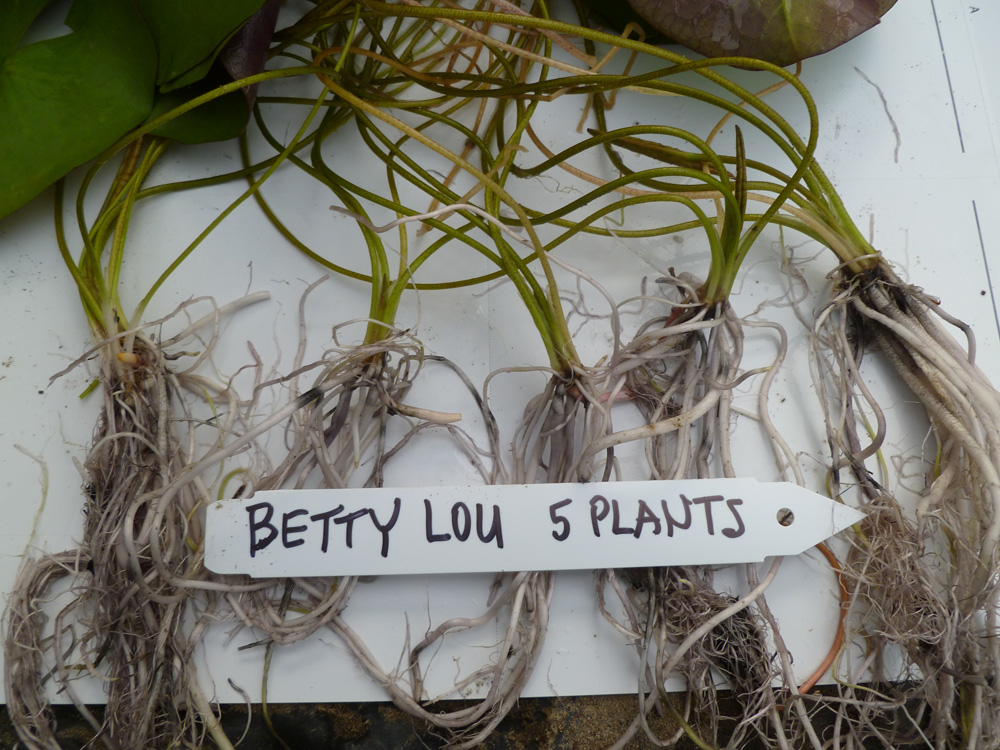
Remove the plants from the planted tuber: After 2 weeks or so, there will be an extensive root system and some roots should be coming out of the bottom of the pot. Remove the tuber from the pot, and rinse away ALL soil. Gently rock the mass of plants back and forth until they separate from the tuber. (The tuber can then go back into a zip lock bag of warm water, and it will sprout more plants in 3 to 4 weeks. This is called “chain propagation”.)
There may be three to six rooted plants in the mass of growth which has been removed from the tuber. The root system for each plant should be teased apart UNDER WATER, to reduce friction and root breakage. A pencil is ideal for helping to separate the root systems under water. It helps to do this in a tub of pond water on a greenhouse bench. Separating the individual root systems is the easy part; now, the plants themselves need to be separated from each other with minimum loss of leaves.
Place the clump of plants on a wet, shaded surface, and begin to separate the leaves for each plant. Start with the plant with the smallest root system. The smaller plant has smaller and fewer leaves, and will be easier to untangle than a larger plant. Work your way up to the largest plants, last. Place each plant in a tub of pond water as soon as it is separated, so it does not dry out. A paper towel or piece of newspaper between each plant will keep them from entangling again. A plant with as few as 3-4 small leaves will usually be successful, as long as it has some good roots. The more and bigger the leaves, and the more roots a plant has, the faster that plant will grow.
Now plant each plant into a four inch (10 cm) pot of fertilized soil. I press the soil to one side of the pot, lower the root system toward the bottom, while leaning it against the “wall” of soil, then fill in the remaining void. This spreads out the roots nicely, in the center of the pot. Place in water at 70-80 degrees F. (21-26 C) or higher, and check after two weeks to see if roots are coming out of the bottom of the pot. If so, it is time to transplant to a larger pot. Two to three weeks is the maximum time that most plants need to remain in the small pot before transplanting to a six inch (15 cm) pot…unless you are making tubers. In that case, leave the plant in the small pot, remove escaping roots weekly, and the plant will go dormant in 6-8 weeks, having formed a tuber.
Remember: although tubers must be sprouted in water temperatures between 80-90 degrees F (26-32 C), after the new rooted plants have formed on the tuber, and the tuber with its rooted plants is planted into a pot of fertilized soil, temperatures of 70 degrees F (21 C) or higher are sufficient to promote decent growth. But warmer water will give faster growth.
Sometimes an overlooked zip lock bag will be found with a tuber which has lots of plants, each with extensive root system. In this case, rather than planting them as a unit, as is usually done, one can remove the plants immediately, and tease the roots and plants apart…and plant each plant directly into its beginning pot.
Growing to saleable size: Once the four inch (10 cm) potted plant has been transplanted into a six inch (15 cm) pot of fertilized soil, it will take 3 to 4 weeks to reach flowering size. Plants should NOT be left in the 15 cm pot longer than 4 weeks…or they may cramp and starve, and begin to go dormant. If plants are to be sold now, soil can be rinsed from the root system for shipping, or, the plants can be transplanted into 10-12 inch (25-30 cm) pots which will be big enough for the entire season. NOTE: Aussies will recover well from shipping IF they have all their roots and leaves, and they are quickly replanted into fertilized soil, in water that is at least 75-80 degrees F.
Other observations: When N. Betty Lou plants are small, in the 4 inch (10 cm) or 6 inch (15cm) pots, their flowers will not be impressive! The flower color may be pale, and the leaf spread will be more spread out than will be seen on a mature plant. Once it has been in a 10 inch pot (25 cm) of fertilized soil, the blooms will become darker in color, the stamens a very deep pink/red, and the larger leaves will have shorter stems. At this stage, only five mature, newer leaves need to be left on the plant to insure blooms. This observation is true for almost all tropical lilies…they make far more leaves than they need to stay in bloom.
In a ten inch pot, N. Betty Lou can have a spread of 5 feet before some outer leaves turn yellow; but it can be kept to a spread of only 4 feet by removing the older, outer leaves, as long as 5 young leaves are left on the plant.
In a commercial production situation, where it is desirable to minimize overcrowding, I would reduce each 6 inch (15 cm) potted plant to the youngest 4 leaves every week. Four inch (10 cm) potted lilies are allowed to keep any leaf that is not beginning to yellow.
The secret to producing enough plants for the beginning of the sales season is two fold: You must start the tubers into growth in 85-90 degree F water…and you must start the process early, by February 15th in the U.S…. about four months before your targeted date for sales. This is true not only for Betty Lou, but for any of the Aussie hybrids or species.
There has long been a myth in the industry that Australian water lilies are prone to go dormant when they are shipped. Not true! IF they have most their roots and leaves intact, and they are immediately replanted into fertilized soil, in a pond of 75-80 degrees F ( 23-27 C), they will not go dormant on the customer. I have shipped Aussies to Denver, Florida, and to West Virginia, with no problem. When shipping Australian lilies bare root, you MUST leave as many roots and leaves as possible. Other species of lilies seem to recover well when most leaves and roots have been removed for shipment, but this is NOT true for Aussies!
Another myth is that Australian water lilies require deep water. They may tolerate deep water in Australia, but we grow a number of Aussies with only 6 inches (15 cm) of water over their pots, and they are just fine. There is one benefit to deeper water however: those Aussies that have large flowers and long stems seem to resist falling over in rainstorms when the water is 25 inches (62 cm) over the soil level in the pot. (One of the benefits of Betty Lou is that it does not need the support of deeper water to keep its blooms erect.)
Finally, all of the cultural information above is applicable to any Australian native or hybrid water lily. The Aussie lily Albert de Lestang has been available in the US market for many years, and it is easy to grow. I think that immutabilis is also a very easy species to grow, and it can be raised from seed, too. To prevent premature sprouting of immutabilis seeds, I store them in water at 60-70 degrees F. (15-21 C)
When I am ready to germinate any Aussie seed, I place the seeds in zip lock bags of water, in a 90 degree heated tank. I plant the seeds into shallow trays of fertilized soil when I see at least 30-40% germination in the bags, which may take 3 to 4 weeks. I place about 40-50 germinating seeds on the surface of a 10 inch (25 cm) saucer of wet, fertilized soil, and then cover completely with ¼ inch of sand. Wet the soil carefully so as not to dislodge the seeds, and then gently slip the saucer under water in a heated tank. Raise the saucer to within an inch of the surface. ( I prop them up on an empty pot.) Separate and replant the seedlings when most have a few floating leaves that are at least 1-2 inches in diameter, planting one seedling to each four (10 cm) inch pot of fertilized soil. In 2-3 weeks, they will need to go into larger pots, unless you want to tuber them. In that case, plant 3 or four seedlings in the same 10 cm pot, and do not fertilize again. Trim any roots that come out of the bottom of the pot.
Sometimes, after the seedlings have floating leaves, but are still too small to be transplanted from their seed tray, I like to push some crumbs of fertilizer tablets into the soil in between the seedlings, to encourage more growth. Alternately, I invert the seedling tray, let the intact mass of rooted seedlings dislodge from the tray, sprinkle some fertilizer on the root mass, and then return it to its tray. Seedlings with floating leaves may need to be transplanted within ten days or so after this supplemental feeding.
2 thoughts to “Growing, propagating and Hybridizing Australian Waterlilies”
Just read this article by rich sacher.. almost every information covered except hybridizing..
Very useful information.
We have clay soil from a riverside awailable. Should we mix vermicompost n sand in full soil? Or do we put vermicompost only as bottom layer?
Many people here r using cowdung manure n getting good results as they say. But i have never used it. What is your feedback on using cowdung manure?
I m using a mix of 7 part clay soil, 3 part varmicompost and 1 part sand.this mixture helps to grow good rooting system. But for tubering i did not get good results cause i had planted 1 plant each in 4 inch pot.as rich says for tubering fast we should plant 3 plants in a 4 inch pot n keep cutting roots n let the plant starve by not fertilizing again,i’ll give a try this season.This mixture i have been using since 5 years now and getting good results in the growing season, but once it rains heavilly, my tubers start rotting. What to do then? I had to remove all tubers in e rainy season this year once they started loosing leaves, checked n the tubers were started rotting at their bottom, almost all of them. I cut the rotting part, once healed i planted again. Luckilly the head of all very healthy. Do we need to repot twice a year for the ones we want to keep for display and continous flowers?. Another reason can be fertilizer deficiency for tubers rotting?? Plz reply. I need to be cautious this season before i get into this kind of repeated trouble this year.
Ps. Plz cover the hybridizing part in detail. As to how to choose the parent, what results we could get, cause it is a very vast topic n with rich as an experience of years of trials, much time would be saved if we learn from him.
Thank u so much
Neeta
Thank u rich ❤️